- 您現(xiàn)在的位置:買賣IC網(wǎng) > PDF目錄369952 > PCSYSCON PC(ISA)BUS I/O CARD PDF資料下載
參數(shù)資料
| 型號(hào): | PCSYSCON |
| 英文描述: | PC(ISA)BUS I/O CARD |
| 中文描述: | 電腦(ISA)總線的I / O卡 |
| 文件頁數(shù): | 10/36頁 |
| 文件大小: | 383K |
| 代理商: | PCSYSCON |
第1頁第2頁第3頁第4頁第5頁第6頁第7頁第8頁第9頁當(dāng)前第10頁第11頁第12頁第13頁第14頁第15頁第16頁第17頁第18頁第19頁第20頁第21頁第22頁第23頁第24頁第25頁第26頁第27頁第28頁第29頁第30頁第31頁第32頁第33頁第34頁第35頁第36頁
already installed at particular addresses. There are several ways
round this. Firstly, try running the board at address 180H(see
Section 3 for installation information). This is often unused. If you
can't get any information from the PC manufacturer, run a program
like Quarterdeck's Manifest, which makes a reasonable attempt to
discover the addresses of common peripherals. Finally, see Section
3 for fault-finding information.
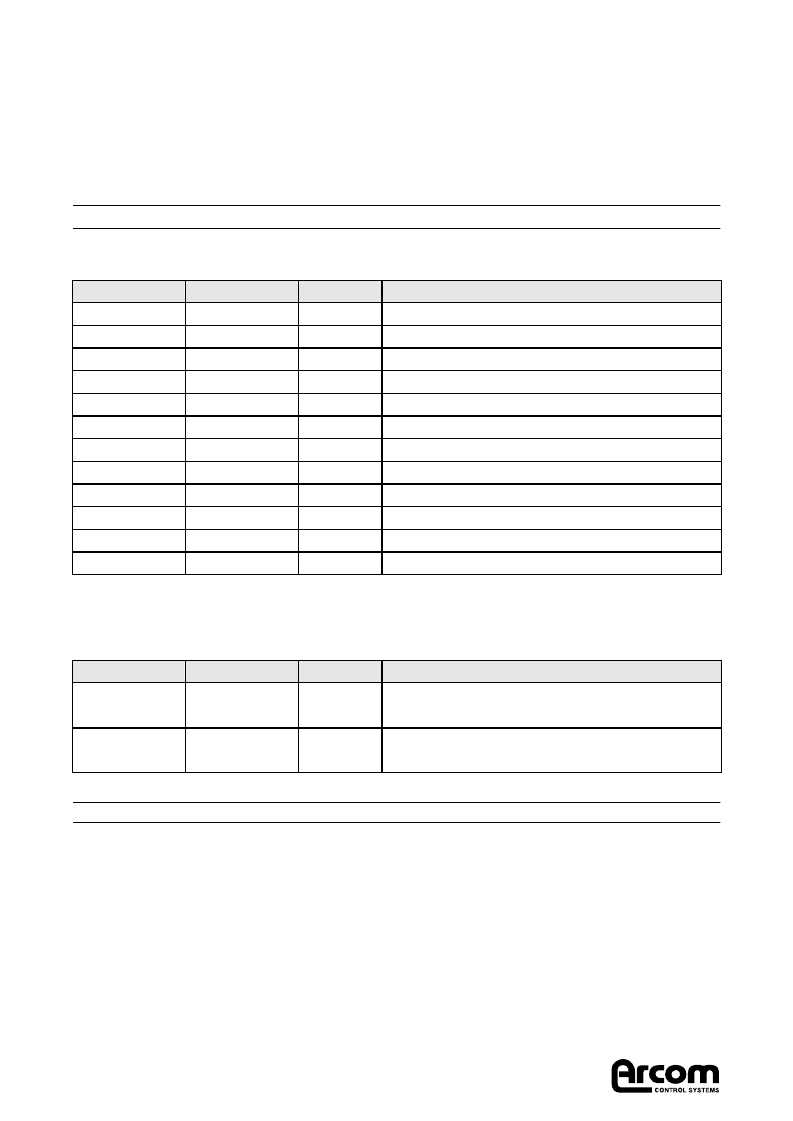
The Registers on the PCSYSCON
The following table shows the I/O registers on the PCSYSCON.
The following table shows the special function registers on the
PCSYSCON.
How to Write to the Registers
It is useful to remember that the pointer register only needs to be
written to once if only one register is read or written. This means that
I/O can then be done with byte reads and writes. However, if your
program is continually changing registers it must write a new pointer
value each times it accesses a new register. This can be done by
writing a pair of bytes as a word, because the CPU in a PC does
word writes to the bus (which is one byte wide) by writing the lower
byte first, thus setting up the pointer register first.The sub-section A
Quick Installation Test shows the basics of how to write to the control
register.
2192-09065-000-000
Section 2. The PCSYSCON I/O Map
Page 10
J278 PCSYSCON
Pointer Value
09
08
08
07
06
05
04
04
03
02
01
00
STARTW
STATUS
RETRIGW
BUZM
RELM
INTM
G1IN
G0OUT
DACTEMP
DAC-12
DAC+12
DAC+5
W
R
W
R/W
R/W
R/W
R
W
R/W
R/W
R/W
R/W
Start watchdog and set final timeout
Read board status
Retrigger watchdog
Buzzer mask
Relay mask
Interrupt mask
Read from group 1 inputs
Write to group 0 inputs
Set temperature comparison
Set -12V comparison
Set +12V comparison
Set +5V comparison
Register Name Read/write
Comments
Pointer Value
81H
Board Ident
User LED
R
W
Reading this should always give a value of 80H
for the PCSYSCON
Writing 01 switches the green LED on. Writing 00
switches it off.
80H
Register Name Read/write
Comments
相關(guān)PDF資料 |
PDF描述 |
|---|---|
| PCT125-SERIES | Optoelectronic |
| PCT13EP | Telecommunication IC |
| PCT13ES | Telecommunication IC |
| PCT13P | Telecommunication IC |
| PCT13S | Telecommunication IC |
相關(guān)代理商/技術(shù)參數(shù) |
參數(shù)描述 |
|---|---|
| PCSZT044A1 | 制造商:TE Connectivity 功能描述: |
| PCSZT068A1 | 制造商:TE Connectivity 功能描述: |
| PCT | 功能描述:熔絲座 GMT TYPE RoHS:否 制造商:Littelfuse 產(chǎn)品: 電流額定值:30 A 電壓額定值:1000 VDC 極數(shù):1 系列: 安裝風(fēng)格:DIN Rail 端接類型: 軸類型: 工作溫度范圍: |
| PCT .33/35AK | 制造商:Nemco Electronics Corporation 功能描述: |
| PCT 050705 | 制造商:FIBOX 功能描述:ENCLOSURE DIN RAIL POLYCARBO 制造商:FIBOX 功能描述:ENCLOSURE, DIN RAIL, POLYCARBONATE CLEAR; Enclosure Type:Box; Enclosure Material:Polycarbonate; Body Color:Clear; External Height - Imperial:1.8"; External Height - Metric:46mm; External Width - Imperial:2"; IP Rating:IP66, IP67 ;RoHS Compliant: Yes |
發(fā)布緊急采購,3分鐘左右您將得到回復(fù)。